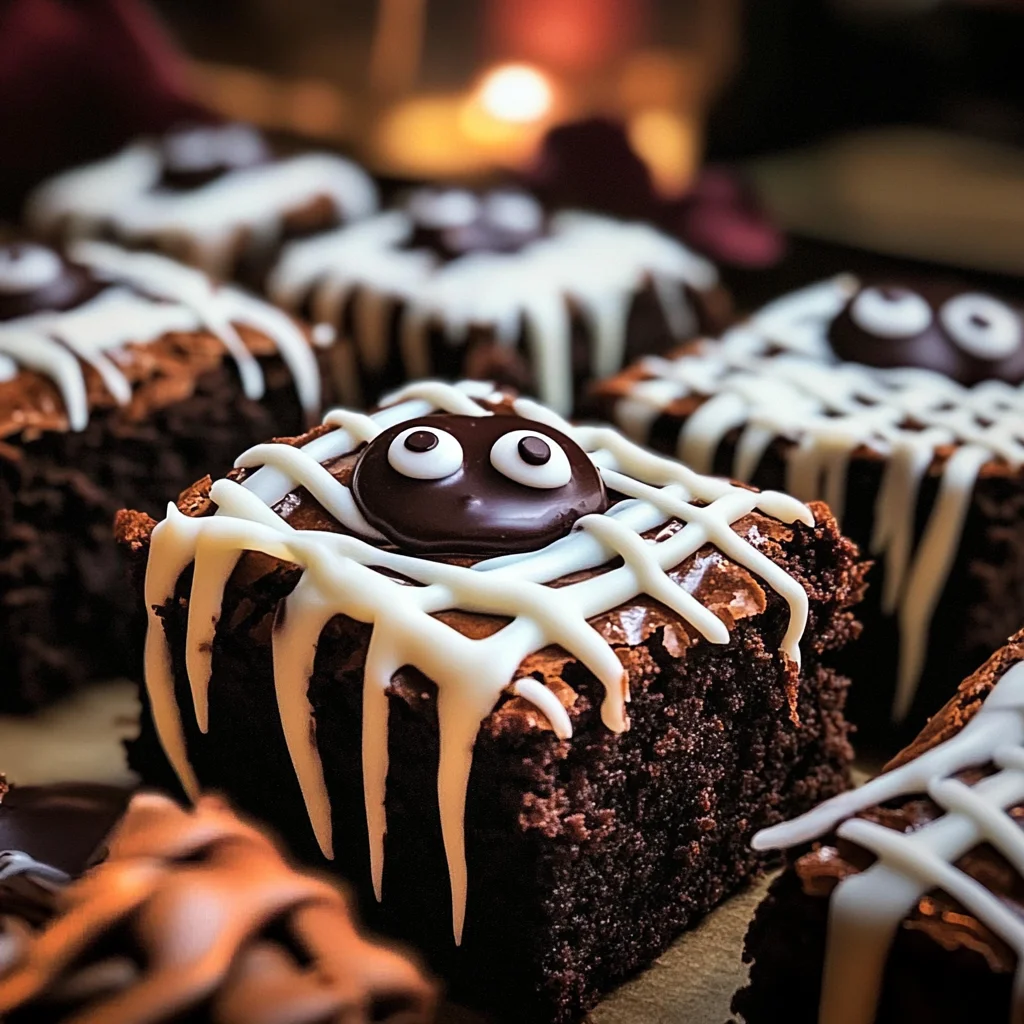
Almost too cute to eat, these spooky mummy brownies are the perfect Halloween treat! With their adorable design and rich chocolate flavor, they bring a festive touch to any gathering. Whether for a party, school event, or cozy night in, these brownies will delight both kids and adults alike. Get ready to impress your guests with these fun and delicious spooky mummy brownies!
Why You’ll Love This Recipe
- Easy to Make: With simple ingredients and straightforward instructions, you can whip these up in no time!
- Fun Decoration: The unique mummy design adds a playful element to your dessert table.
- Rich Chocolate Flavor: Indulge in the deep, satisfying taste of chocolate that everyone loves.
- Kid-Friendly: Perfect for involving little ones in the kitchen—let them help decorate!
- Versatile Occasion: Ideal for Halloween parties, fall gatherings, or just a fun dessert at home.
Tools and Preparation
To create your spooky mummy brownies, having the right tools makes all the difference. These essentials will help you achieve the best results.
Essential Tools and Equipment
- 9 x 9 inch cake pan
- Parchment paper
- Microwave-safe bowls
- Stand mixer or mixing bowls
- Spatula
- Fork
- Baking sheet
Importance of Each Tool
- 9 x 9 inch cake pan: This size ensures even baking and helps you achieve perfectly cut brownies.
- Spatula: A good spatula is crucial for spreading batter evenly and scraping down the sides of bowls.
- Microwave-safe bowls: These are essential for melting chocolate safely without burning it.

Ingredients
Almost too cute to eat. Honestly, I can’t eat them because they’re way too cute. But so delicious. It’s a moral battle.
Ingredients:
– 10 tbsp butter
– 1 1/2 cups dark chocolate chips or chunks
– 1 cup sugar
– 1/4 cup dark brown sugar
– 3 eggs, at room temperature
– 1 tsp espresso powder (optional)
– 2 tsp vanilla extract
– 3/4 cup all purpose flour
– 1/3 cup unsweetened cocoa powder
– 1/2 tsp baking powder
– 1/2 tsp kosher salt
– 1 package candy eyes
– 20 oz semi-sweet or milk chocolate chips
– 1 tbsp coconut oil
– 1 cup powdered sugar
– 2-3 tbsp heavy cream, to thin
How to Make spooky mummy brownies
Step 1: Preheat the Oven
Preheat your oven to 350 degrees Fahrenheit. Line a 9 x 9 inch cake pan with parchment paper, ensuring it hangs over the edges for easy removal later.
Step 2: Melt Chocolate and Butter
In a microwave-safe bowl:
1. Heat 1 cup of dark chocolate chips with the butter for about one minute.
2. Stir until smooth; if necessary, microwave for an additional 20 seconds.
3. Whisk in both sugars until dissolved.
Step 3: Beat Eggs
In a stand mixer:
1. Vigorously beat three eggs until very frothy (about 2–3 minutes).
2. While mixing, slowly add the melted chocolate mixture until smooth.
3. Mix in espresso powder (if using) and vanilla extract.
Step 4: Combine Dry Ingredients
To the egg mixture:
1. Add flour, cocoa powder, baking powder, and salt.
2. Beat until just combined.
3. Gently fold in the remaining half cup of chocolate chips.
Step 5: Bake Brownies
Spread the batter evenly into your prepared pan:
1. Bake for approximately 25–30 minutes.
2. Check doneness by inserting a toothpick; it should come out with just a few moist crumbs.
3. Let cool before cutting into squares; place them in the freezer for about 15 minutes.
Step 6: Prepare Chocolate Coating
In another microwave-safe bowl:
1. Combine semi-sweet or milk chocolate chips with coconut oil.
2. Heat for one minute; stir until smooth—warm again if needed.
3. Allow to cool slightly while preparing your baking sheet with parchment.
Step 7: Coat Brownies
Remove chilled brownies from the freezer:
1. Dip each brownie into melted chocolate using a fork to coat all sides thoroughly.
2. Let excess chocolate drip back into the bowl before placing on parchment-lined baking sheet.
3. Refrigerate for about another fifteen minutes to set.
Step 8: Make Bandage Icing
For decorating:
1. In a bowl, whisk powdered sugar with one tablespoon of heavy cream.
2. Add more cream as needed until it reaches a thick consistency similar to glue.
3. Transfer icing into a ziptop bag or pastry bag fitted with a thin tip.
Step 9: Decorate Mummy Brownies
Once cooled:
1. Draw crisscross patterns on each brownie using the icing for bandages.
2. Attach candy eyes onto the icing while it’s still wet.
3. Let harden for about ten minutes before serving.
Enjoy your delightful spooky mummy brownies at your next gathering!
How to Serve spooky mummy brownies
These adorable spooky mummy brownies make a fun and festive dessert for any Halloween celebration. Here are some creative serving suggestions to enhance the presentation and enjoyment of your treats.
For a Halloween Party
- Serve on a spooky-themed platter surrounded by faux cobwebs for an eerie effect.
- Pair with themed napkins featuring ghosts or pumpkins to elevate the festive mood.
With Ice Cream
- Plate with a scoop of vanilla or pumpkin ice cream for a delicious contrast to the rich chocolate.
- Drizzle with chocolate sauce or caramel for extra indulgence.
As Party Favors
- Wrap individual brownies in clear cellophane bags tied with orange ribbons.
- Add a small tag that reads “Happy Halloween” for a personal touch.
With Hot Beverages
- Serve alongside warm apple cider or hot cocoa to complement the dessert.
- Offer whipped cream as an optional topping for hot drinks.
In Lunchboxes
- Include as a sweet treat in kids’ lunchboxes during the Halloween season.
- Pair with fruit like apple slices or grapes for a balanced snack.
How to Perfect spooky mummy brownies
To ensure your spooky mummy brownies turn out perfectly every time, consider these helpful tips.
- Use quality chocolate: Opt for high-quality dark chocolate chips to enhance the flavor of the brownies.
- Measure accurately: Use precise measurements for ingredients, especially flour and cocoa powder, to achieve the right texture.
- Do not overmix: Mix just until combined when adding dry ingredients to prevent dense brownies.
- Cool completely: Allow brownies to cool completely before dipping in chocolate coating for better adherence.
- Adjust icing thickness: Aim for icing that is thick enough to hold its shape but not too runny; adjust with cream as needed.
- Chill before serving: Refrigerate after decorating for at least 10 minutes to set the icing properly.
Best Side Dishes for spooky mummy brownies
Pairing side dishes with your spooky mummy brownies can create a delightful dessert spread. Here are some great options:
- Pumpkin Spice Cookies: Soft and spiced cookies that harmonize beautifully with chocolate flavors.
- Apple Slices with Caramel Dip: Fresh apple slices provide a crisp contrast, complemented by sweet caramel dip.
- Chocolate Covered Pretzels: Salty and sweet pretzels add crunchiness, offering a different texture alongside brownies.
- Ghostly Marshmallow Treats: Rice cereal treats shaped like ghosts create a fun visual appeal and contrast in flavors.
- Mini Pumpkin Pies: Individual pumpkin pies bring seasonal flavors that pair well with chocolate desserts.
- Candy Corn Mix: A colorful mix of candy corn and nuts adds sweetness and crunch, perfect for snacking.
Common Mistakes to Avoid
Baking spooky mummy brownies can be a fun experience, but there are common mistakes that can lead to less-than-perfect results.
- Neglecting to Measure Ingredients: Not measuring accurately can alter the texture and flavor. Use a kitchen scale or measuring cups for precision.
- Skipping the Cooling Time: Cutting into brownies too soon can result in a gooey mess. Allow them to cool completely before slicing for clean edges.
- Overmixing the Batter: Overmixing can make brownies tough. Mix just until combined for a fudgy texture.
- Using the Wrong Pan Size: Using a pan that’s too small or too large can affect baking time. Stick to the recommended 9 x 9 inch pan for best results.
- Not Testing for Doneness: Relying solely on baking time can lead to undercooked or overcooked brownies. Use a toothpick to check; it should come out with a few moist crumbs.
Storage & Reheating Instructions
Refrigerator Storage
- Store spooky mummy brownies in an airtight container.
- They will last up to 5 days in the refrigerator.
Freezing spooky mummy brownies
- Wrap each brownie individually in plastic wrap before placing them in a freezer-safe bag or container.
- They can be frozen for up to 3 months.
Reheating spooky mummy brownies
- Oven: Preheat to 350°F (175°C) and warm brownies for about 10 minutes.
- Microwave: Heat for 10-15 seconds, checking carefully to avoid overheating.
- Stovetop: Place on low heat in a pan, covering with a lid for about 5 minutes.
Frequently Asked Questions
If you have questions about making spooky mummy brownies, we’ve got answers!
What makes spooky mummy brownies special?
Spooky mummy brownies are not only delicious but also visually fun, making them perfect for Halloween parties and gatherings.
How do I customize spooky mummy brownies?
You can customize these brownies by adding nuts, different types of chocolate chips, or even flavored extracts like mint or almond.
Can I make these spooky mummy brownies gluten-free?
Yes! Substitute all-purpose flour with a gluten-free blend to enjoy these treats without gluten.
How do I store leftover spooky mummy brownies?
Store any leftovers in an airtight container in the refrigerator for up to five days or freeze them for longer storage.
Final Thoughts
These spooky mummy brownies are not just adorable; they are also rich and fudgy, perfect for Halloween celebrations. Feel free to customize them with your favorite toppings or flavors. Try making them today and impress your friends and family!
Spooky Mummy Brownies

Get ready to delight your guests with these adorable spooky mummy brownies, the perfect Halloween treat! With their charming design and rich chocolate flavor, these brownies are sure to be a hit at any gathering. Easy to make and fun to decorate, they offer a festive touch that both kids and adults will love. Whether for a Halloween party or a cozy night in, these spooky treats will bring joy and sweetness to your celebrations.
- Prep Time: 15 minutes
- Cook Time: 30 minutes
- Total Time: 45 minutes
- Yield: Approximately 16 servings 1x
- Category: Dessert
- Method: Baking
- Cuisine: American
Ingredients
- 10 tbsp butter
- 1 1/2 cups dark chocolate chips
- 1 cup sugar
- 1/4 cup dark brown sugar
- 3 eggs
- 1 tsp espresso powder (optional)
- 2 tsp vanilla extract
- 3/4 cup all-purpose flour
- 1/3 cup unsweetened cocoa powder
- 1/2 tsp baking powder
- 1/2 tsp kosher salt
- 1 package candy eyes
- 20 oz semi-sweet chocolate chips
- 1 tbsp coconut oil
- 1 cup powdered sugar
- 2–3 tbsp heavy cream, to thin
Instructions
- Preheat the oven to 350°F (175°C) and line a 9 x 9 inch cake pan with parchment paper.
- In a microwave-safe bowl, melt butter with dark chocolate chips until smooth. Stir in sugar and allow to cool slightly.
- Beat eggs until frothy and mix with the cooled chocolate mixture along with vanilla extract.
- Add flour, cocoa powder, baking powder, and salt; mix until combined. Fold in remaining chocolate chips.
- Spread batter into the prepared pan and bake for 25–30 minutes until a toothpick comes out clean with moist crumbs.
- Let cool before dipping each brownie in melted semi-sweet chocolate mixed with coconut oil for coating.
- Decorate with icing for 'bandages' and attach candy eyes before serving.
Nutrition
- Serving Size: 1 brownie (45g)
- Calories: 210
- Sugar: 22g
- Sodium: 120mg
- Fat: 12g
- Saturated Fat: 7g
- Unsaturated Fat: 4g
- Trans Fat: 0g
- Carbohydrates: 24g
- Fiber: 2g
- Protein: 3g
- Cholesterol: 50mg


Leave a Comment