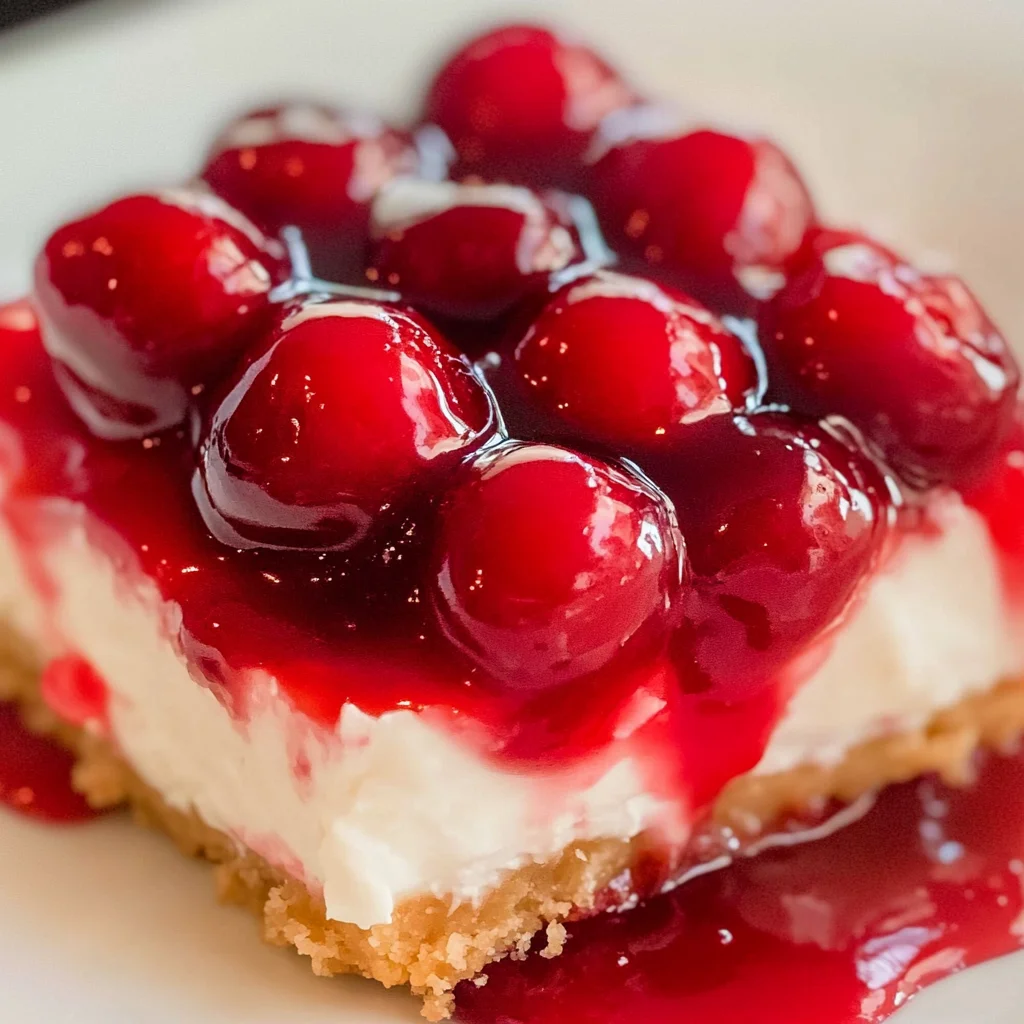
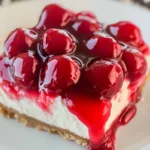
This Recipe for Cherry Cheesecake is the perfect no-bake dessert that will impress your guests and satisfy your sweet tooth. Its creamy texture and delightful cherry topping make it a wonderful choice for any occasion, from casual family gatherings to festive celebrations. Plus, it’s easy to prepare and doesn’t require baking, making it a hassle-free option for busy home cooks.
Why You’ll Love This Recipe
- No-Bake Convenience: This cheesecake requires no baking, saving you time and effort while still delivering an impressive dessert.
- Delicious Flavor: The combination of cream cheese and cherry pie filling creates a rich flavor that everyone will love.
- Perfect for Any Occasion: Whether it’s a birthday party, holiday gathering, or a simple weeknight treat, this cheesecake fits right in.
- Easy to Customize: You can swap the cherry pie filling with other fruits like blueberries or strawberries for variety.
- Make Ahead Delight: Prepare this cheesecake ahead of time and let it chill in the fridge until you’re ready to serve.
Tools and Preparation
To make your no-bake cherry cheesecake successfully, having the right tools on hand is essential. A few basic kitchen tools will streamline your preparation process.
Essential Tools and Equipment
- Food processor
- Mixing bowls
- 8×8 inch pan
- Parchment paper
- Spatula
Importance of Each Tool
- Food processor: This tool makes it easy to create a fine crumb mixture for the crust quickly.
- Mixing bowls: Having multiple sizes allows you to mix different components without mixing flavors unintentionally.
- Parchment paper: Lining your pan with parchment paper ensures easy removal of the cheesecake after chilling.

Ingredients
This no-bake cherry cheesecake is a rich and decadent treat that’s sure to be a crowd-pleaser.
For the Crust
- 9 graham cracker sheets (one sleeve)
- ½ cup melted butter
- 1 tablespoon sugar
For the Filling
- 16 ounces cream cheese (softened)
- 8 ounces Cool Whip
- 1 cup powdered sugar
- 1 teaspoon lemon juice
Topping
- 21 ounces cherry pie filling
How to Make Recipe for Cherry Cheesecake
Step 1: Prepare the Crust
- Place graham cracker sheets in the food processor and pulse into fine crumbs.
- In a medium bowl, combine graham cracker crumbs, melted butter, and sugar until well mixed.
- Line an 8×8 inch pan with parchment paper. Press the graham cracker mixture evenly into the bottom of the pan. Chill in the refrigerator.
Step 2: Make the Filling
- In a large bowl, mix softened cream cheese, Cool Whip, powdered sugar, and lemon juice until smooth and creamy.
- Spread this mixture evenly over the chilled graham cracker crust. Chill for about 5 minutes.
Step 3: Add Cherry Topping
- Spoon cherry pie filling over the cream cheese layer.
- Gently spread out the cherries to cover the entire surface of the cheesecake.
Step 4: Final Chill
- Chill for at least 4 hours before slicing.
- Once set, slice into squares and enjoy!
This delicious no-bake cherry cheesecake is sure to become a favorite in your dessert rotation!
How to Serve Recipe for Cherry Cheesecake
This no-bake cherry cheesecake is perfect for any occasion. Its creamy texture and sweet cherry topping make it a delightful dessert that everyone will love.
Individual Slices
- Serve slices on individual dessert plates for a classic presentation.
- Garnish with whipped cream and a fresh cherry on top for added flair.
Dessert Bars
- Cut the cheesecake into bars instead of traditional slices.
- Arrange them on a serving platter for easy grabbing at parties or gatherings.
Pair with Fresh Fruits
- Serve alongside fresh strawberries, blueberries, or raspberries.
- The tartness of the fruits complements the sweetness of the cheesecake beautifully.
Coffee or Tea
- Offer coffee or herbal tea as a beverage option.
- The warmth from these drinks balances the coolness of the cheesecake.
How to Perfect Recipe for Cherry Cheesecake
Crafting the ideal cherry cheesecake can elevate your dessert game. Here are some tips to ensure your cheesecake is perfect every time.
- Use Room Temperature Cream Cheese: This helps achieve a smooth and creamy filling without lumps.
- Chill Properly: Allow the cheesecake to chill in the refrigerator for at least 4 hours to set properly and enhance flavors.
- Experiment with Toppings: Try different toppings like chocolate shavings or crushed nuts to add texture and flavor variety.
- Avoid Overmixing: Mix ingredients just until combined to prevent incorporating too much air, which can affect the texture.
Best Side Dishes for Recipe for Cherry Cheesecake
Enhancing your dessert experience can be simple with complementary side dishes. Here are some great options to serve alongside your cherry cheesecake.
- Vanilla Ice Cream: A scoop of vanilla ice cream adds creaminess and balances the flavors nicely.
- Fruit Salad: A refreshing fruit salad brings brightness and contrasts well with the richness of the cheesecake.
- Chocolate Mousse: This light yet decadent option pairs wonderfully with fruity desserts like cherry cheesecake.
- Lemon Sorbet: A tangy lemon sorbet provides a refreshing palate cleanser after rich desserts.
- Pecan Pie Bars: These sweet bars add a lovely crunch and nutty flavor that complements your cheesecake.
- Cheese Platter: A selection of mild cheeses can offer an interesting savory contrast to the sweet cheesecake.
Common Mistakes to Avoid
Making a cherry cheesecake can be simple, but avoiding common mistakes is essential for a successful dessert.
- Incorrect crust texture: Not processing the graham crackers finely can lead to a crumbly crust. Ensure you pulse them until they’re fine crumbs for a better hold.
- Overmixing cream cheese: Whipping cream cheese too much can introduce air, leading to cracks. Mix until just smooth and combined.
- Skipping chill time: Rushing the chilling process can result in a runny cheesecake. Allow it to set for at least 4 hours for best results.
- Neglecting lemon juice: Omitting lemon juice may cause the cheesecake to taste flat. Use it to enhance flavors and add brightness.
- Using warm ingredients: Starting with warm cream cheese can result in lumps. Make sure it’s softened but not warm before mixing.
Storage & Reheating Instructions
Refrigerator Storage
- Store your cheesecake in an airtight container.
- It will keep well in the fridge for up to 5 days.
Freezing Recipe for Cherry Cheesecake
- For longer storage, freeze slices in an airtight container.
- It can last up to 2 months in the freezer.
Reheating Recipe for Cherry Cheesecake
- Oven: Preheat to 350°F (175°C) and reheat covered with foil for about 10-15 minutes.
- Microwave: Heat individual slices on low power for 20-30 seconds at a time until warmed through.
- Stovetop: Use a skillet over low heat, covering it with a lid, and heat gently.
Frequently Asked Questions
If you’re curious about specific aspects of this recipe, here are some common questions answered.
What is the best way to serve this Recipe for Cherry Cheesecake?
Serving it chilled or slightly at room temperature enhances its creamy texture. Garnish with fresh cherries or whipped cream for extra flair.
Can I customize the cherry topping?
Absolutely! You can use other fruits like strawberries or blueberries instead of cherries if desired.
How long does this cherry cheesecake last?
If stored properly, it lasts up to 5 days in the refrigerator and can be frozen for up to 2 months.
Can I make this recipe gluten-free?
Yes! Simply substitute gluten-free graham crackers or use crushed nuts as a base for the crust.
Final Thoughts
This no-bake cherry cheesecake is rich, creamy, and versatile, making it perfect for any occasion. Feel free to customize toppings or mix-ins according to your preferences. Give this delightful recipe a try today!
Cherry Cheesecake
Indulge in the delightful experience of making a no-bake cherry cheesecake that perfectly blends creamy texture and fruity flavor. This easy recipe is perfect for busy home cooks who want to impress guests without spending hours in the kitchen. With a rich cream cheese filling layered over a buttery graham cracker crust and topped with luscious cherry pie filling, this dessert is not only visually appealing but also incredibly satisfying. Ideal for family gatherings, birthday parties, or simply as a weeknight treat, this cheesecake can be prepared ahead of time and chilled until serving. Customize it with your favorite fruits or toppings to make it uniquely yours!
- Prep Time: 20 minutes
- Cook Time: N/A
- Total Time: 0 hours
- Yield: Serves approximately 9 slices 1x
- Category: Dessert
- Method: No-Bake
- Cuisine: American
Ingredients
- 9 graham cracker sheets
- ½ cup melted butter
- 1 tablespoon sugar
- 16 ounces cream cheese (softened)
- 8 ounces Cool Whip
- 1 cup powdered sugar
- 1 teaspoon lemon juice
- 21 ounces cherry pie filling
Instructions
- Prepare the crust by blending graham cracker sheets into fine crumbs. Mix with melted butter and sugar until combined. Press into an 8×8 inch pan lined with parchment paper and chill.
- For the filling, beat softened cream cheese with Cool Whip, powdered sugar, and lemon juice until smooth. Spread over the chilled crust and return to the fridge.
- Top with cherry pie filling evenly before chilling for at least 4 hours.
- Slice into squares and serve.
Nutrition
- Serving Size: 1 serving
- Calories: 320
- Sugar: 23g
- Sodium: 210mg
- Fat: 20g
- Saturated Fat: 11g
- Unsaturated Fat: 7g
- Trans Fat: 0g
- Carbohydrates: 34g
- Fiber: 1g
- Protein: 4g
- Cholesterol: 45mg

Leave a Comment