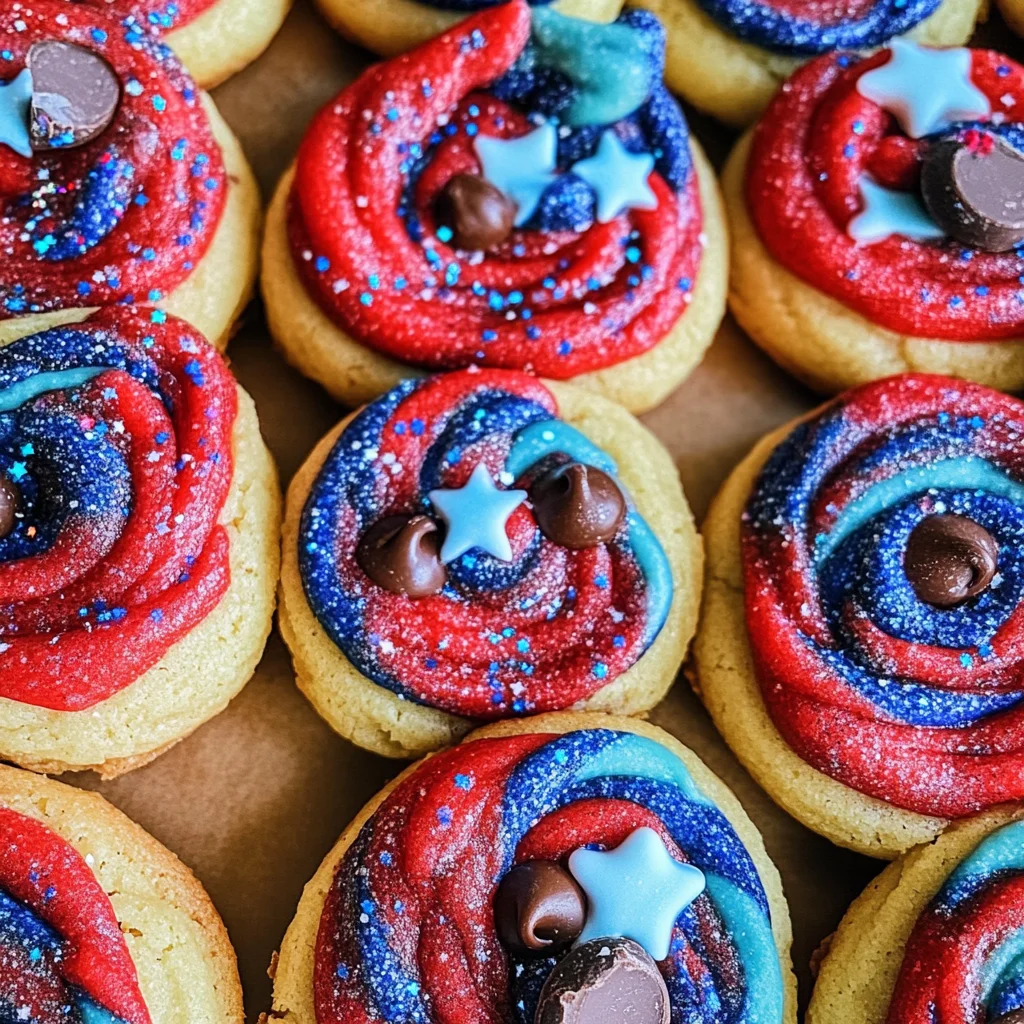
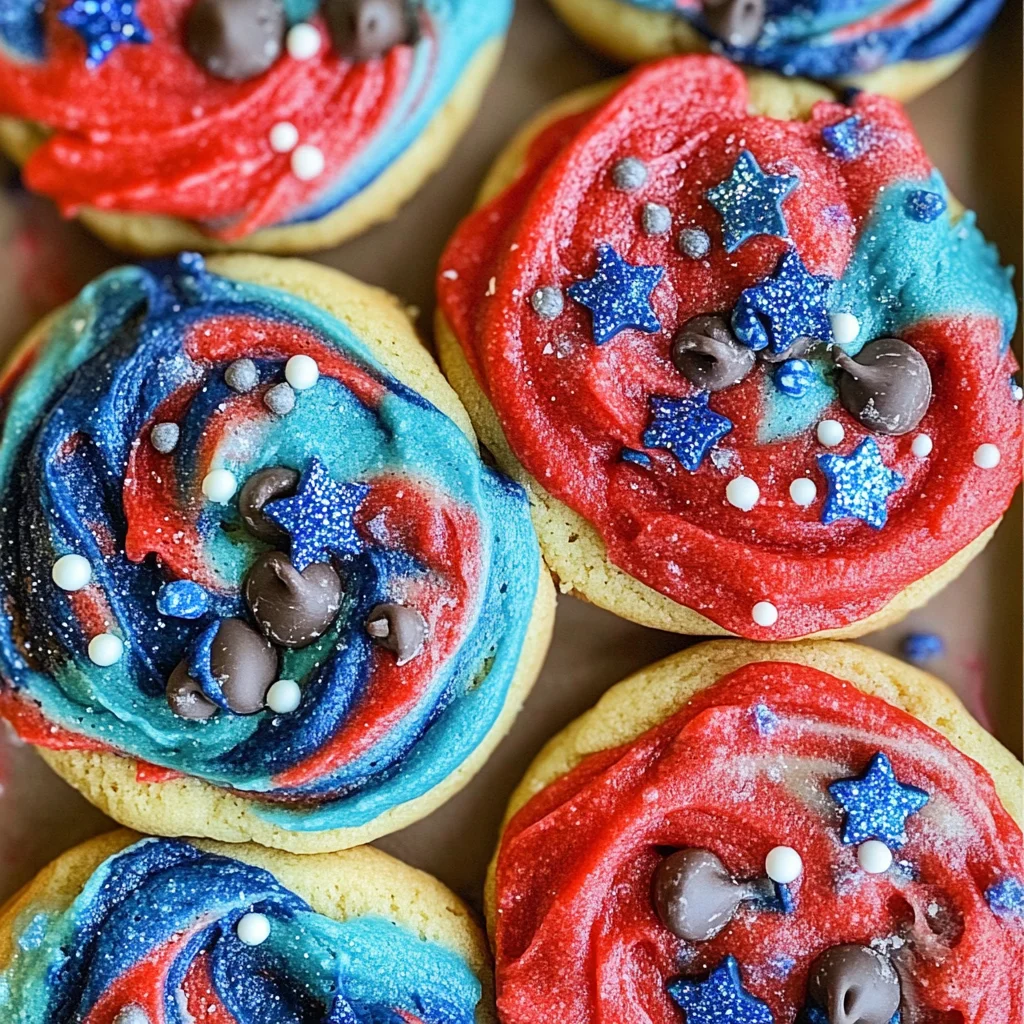
Celebrate America’s birthday with these festive 4th of July Cookies! Soft and ooey-gooey, these red, white, and blue delights are perfect for your Independence Day celebrations. Whether you’re hosting a barbecue or attending a picnic, these cookies will impress everyone with their vibrant colors and delicious chocolatey flavor.
Why You’ll Love This Recipe
- Festive Appearance: The striking red and blue colors make these cookies a standout at any gathering.
- Easy to Make: With simple ingredients and straightforward steps, even novice bakers can whip up this treat.
- Deliciously Chewy: Each bite is packed with gooey chocolate chips that melt in your mouth.
- Customizable Sizes: Choose to make either small bites or giant cookies based on your preference.
- Perfect for Any Occasion: While ideal for the 4th of July, these cookies are great year-round for birthdays or holidays.
Tools and Preparation
Before you start baking these delightful cookies, gather your tools to ensure a smooth process.
Essential Tools and Equipment
- Stand mixer
- Mixing bowls
- Baking sheets
- Parchment paper or silicone baking mats
- Rubber spatula
- Measuring cups and spoons
Importance of Each Tool
- Stand mixer: Makes creaming butter and sugars effortless, ensuring a smooth cookie dough.
- Baking sheets: Provides a sturdy surface for baking multiple cookies at once without warping.
- Parchment paper or silicone baking mats: Prevents cookies from sticking and ensures easy clean-up.
Ingredients
To create the perfect 4th of July Cookies, you’ll need the following ingredients:
- 2 1/2 cups all-purpose flour
- 1 1/2 cups cake flour
- 2 tsp. cornstarch
- 1 tsp. baking soda
- 1 tsp. baking powder
- 1 tsp. salt
- 1 cup cold, unsalted butter, cubed
- 1 cup brown sugar, packed (dark or light)
- 1/2 cup granulated sugar
- 2 large eggs
- 2 large egg yolks
- 2 tsp. vanilla extract
- 3 cups milk chocolate chips (or less if desired)
- red and blue gel food coloring
- edible glitter stars
How to Make 4th of July Cookies
Step 1: Prepare Your Baking Sheets
Line two baking sheets with parchment paper or silicone baking mats. Set aside to prepare for the cookie dough.
Step 2: Mix Dry Ingredients
In a large bowl, combine the dry ingredients:
1. Add all-purpose flour.
2. Add cake flour.
3. Add cornstarch, baking soda, baking powder, and salt.
4. Whisk together until evenly mixed.
Step 3: Cream Butter and Sugars
In the bowl of your stand mixer:
1. Place cubed butter along with brown sugar and granulated sugar.
2. Secure the paddle attachment.
3. Mix on medium speed for about 2–3 minutes until creamy and smooth.
Step 4: Add Eggs and Vanilla
Continue mixing while adding:
1. Two large eggs.
2. Two egg yolks.
3. Vanilla extract.
4. Scrape down the sides of the bowl with a rubber spatula as needed to ensure everything is well combined.
Step 5: Combine Dry Ingredients with Wet Mixture
Gradually add the dry ingredients mixture into the wet mixture until fully incorporated:
1. Mix gently to avoid overworking the dough.
2. Fold in chocolate chips just until combined.
Step 6: Preheat Your Oven
Preheat your oven to 400°F while you prepare the cookie dough logs.
Step 7: Divide Dough into Sections
Divide the cookie dough into three equal sections:
1. Use a kitchen scale if you have one for precision—this helps ensure even baking.
Step 8: Color Your Dough
Add food coloring:
1. Red gel food coloring to one section.
2. Blue gel food coloring to another section.
3. Leave the third section plain.
4. Mix well until colors are deep; refrigerate if dough becomes sticky.
Step 9: Shape Your Cookies
Roll each section into long logs:
1. Each log should be about 15 inches long.
2. Place logs next to each other on plastic wrap or parchment paper and roll them together into one uniform log.
Step 10: Cut and Place on Baking Sheets
Cut sections from the log according to your desired cookie size:
1. Roll each piece into a ball.
2. Arrange on prepared cookie sheets (6 per sheet).
Step 11: Bake
Bake in preheated oven for about 10 minutes:
1. Watch for edges just starting to brown—this indicates they’re done!
2. Optionally press more chocolate chips onto warm cookies after removing them from the oven.
Step 12: Cool and Decorate
Let cookies rest on sheets for about 5–10 minutes before transferring them to wire racks:
1. Decorate with edible glitter stars before serving!
Enjoy your deliciously festive cookies!
How to Serve 4th of July Cookies
Serving your festive 4th of July Cookies can enhance their appeal during your Independence Day celebrations. Here are some fun and creative ways to present these delicious treats.
Cookie Platters
- Arrange cookies on a large platter, alternating red, white, and blue cookies for a colorful display.
Ice Cream Sandwiches
- Use two cookies to sandwich a scoop of vanilla or berry ice cream for a refreshing dessert treat.
Party Favors
- Package individual cookies in clear bags tied with red, white, and blue ribbons for guests to take home as sweet reminders of the celebration.
Dessert Table Highlight
- Create a dedicated dessert table featuring the cookies alongside other patriotic treats like fruit skewers and cupcakes for visual impact.
Themed Serving Dishes
- Use themed serving dishes or tiered cake stands decorated with stars and stripes to elevate the presentation.
How to Perfect 4th of July Cookies
Perfecting your 4th of July Cookies is key to achieving that soft, gooey texture. Here are some tips to ensure they turn out just right.
-
Chill the Dough: Refrigerating the cookie dough for at least 30 minutes helps prevent spreading during baking.
-
Measure Ingredients Accurately: Use measuring cups and spoons for precision, ensuring the right balance of flour and sugar.
-
Do Not Overmix: After adding chocolate chips, mix just until combined; overmixing can lead to tough cookies.
-
Monitor Baking Time: Keep an eye on the cookies as they bake. Remove them from the oven when the edges are golden but the centers look slightly underbaked.
Best Side Dishes for 4th of July Cookies
Pairing side dishes with your 4th of July Cookies can create a festive atmosphere and complement your dessert offerings. Here are some great suggestions:
-
Fruit Salad: A mix of seasonal fruits like watermelon, blueberries, and strawberries adds freshness and color that matches your cookies.
-
Patriotic Punch: Create a vibrant punch using cranberry juice, lemon-lime soda, and floating fruit slices for a refreshing beverage option.
-
Veggie Platter: Serve fresh vegetables like carrots, cucumber sticks, and bell pepper strips with ranch dip for a healthy contrast to sweet treats.
-
Cheese Board: Offer an assortment of cheeses paired with crackers and grapes for a savory option that balances the sweetness of the cookies.
-
Grilled Corn on the Cob: Sweet corn brushed with butter makes an excellent side dish that brings summer flavors to your celebration.
-
Caprese Skewers: Cherry tomatoes, mozzarella balls, and basil drizzled with balsamic glaze provide a colorful appetizer that’s easy to eat.
-
Potato Salad: Classic potato salad offers heartiness alongside your dessert spread without being overly filling.
-
Deviled Eggs: These flavorful bites are always a hit at gatherings and add a touch of elegance to your menu.
Common Mistakes to Avoid
When baking 4th of July Cookies, it’s easy to make mistakes that can affect the final outcome. Here are some common pitfalls to watch for:
- Using warm ingredients: Using butter that is too warm can lead to cookies that spread too much. Always use cold, cubed butter for the best texture.
- Not measuring flour correctly: Scoop and pack flour tightly into your measuring cup, which can lead to dry cookies. Instead, spoon flour into the cup and level it off with a knife for accuracy.
- Overmixing the dough: Mixing too long after adding the dry ingredients can make cookies tough. Mix just until combined to keep them soft and chewy.
- Skipping the chilling step: If your dough becomes sticky, skipping refrigeration could result in flat cookies. Chill the dough if needed before rolling.
- Ignoring baking time: Baking cookies longer than recommended can lead to dryness. Keep an eye on them and remove when edges are lightly browned.
Storage & Reheating Instructions
Refrigerator Storage
- Store cookies in an airtight container for up to 1 week.
- To maintain freshness, layer parchment paper between cookie layers.
Freezing 4th of July Cookies
- Freeze baked cookies in a single layer on a baking sheet for about 2 hours before transferring to a freezer-safe bag or container.
- They can be frozen for up to 3 months.
Reheating 4th of July Cookies
- Oven: Preheat the oven to 350°F (175°C) and bake for 5-7 minutes for warm cookies.
- Microwave: Heat individually for about 10-15 seconds for a quick warm-up.
- Stovetop: Use a skillet over low heat; cover briefly to warm without drying out.
Frequently Asked Questions
Here are some common questions about making 4th of July Cookies:
Can I use different types of chocolate chips?
Yes! You can substitute milk chocolate with dark, white, or even butterscotch chips based on your preference.
How can I customize my 4th of July Cookies?
Add nuts like pecans or walnuts, or include dried fruits such as cranberries for added flavor and texture.
What’s the best way to decorate 4th of July Cookies?
Use red and blue icing or edible glitter stars after baking. Get creative with different toppings!
How do I ensure my cookies are chewy?
To achieve chewier cookies, slightly underbake them and allow them to cool on the baking sheet.
Final Thoughts
These 4th of July Cookies are not only festive but also incredibly versatile! With their soft texture and delightful flavors, they are perfect for any summer celebration. Feel free to customize by adding your favorite mix-ins or toppings. Try this recipe and enjoy these patriotic treats at your next gathering!
4th of July Cookies

Celebrate Independence Day with these vibrant 4th of July Cookies! Bursting with red, white, and blue colors, these soft and chewy delights are perfect for any summer gathering. Whether you’re hosting a barbecue or attending a picnic, these cookies will impress your guests with their delicious chocolatey flavor and festive appearance. Easy to make, even novice bakers can create these stunning treats that are not only fun to eat but also visually appealing. Customize the sizes and decorations to suit your celebration and enjoy a sweet reminder of America’s birthday.
- Prep Time: 20 minutes
- Cook Time: 10 minutes
- Total Time: 30 minutes
- Yield: Approximately 24 cookies 1x
- Category: Dessert
- Method: Baking
- Cuisine: American
Ingredients
- 2 1/2 cups all-purpose flour
- 1 1/2 cups cake flour
- 2 tsp. cornstarch
- 1 tsp. baking soda
- 1 tsp. baking powder
- 1 tsp. salt
- 1 cup cold, unsalted butter, cubed
- 1 cup brown sugar, packed (dark or light)
- 1/2 cup granulated sugar
- 2 large eggs
- 2 large egg yolks
- 2 tsp. vanilla extract
- 3 cups milk chocolate chips
- red and blue gel food coloring
- edible glitter stars
Instructions
- Preheat your oven to 400°F and line baking sheets with parchment paper.
- Whisk together the flours, cornstarch, baking soda, baking powder, and salt in a bowl.
- In a stand mixer, cream together the cold butter, brown sugar, and granulated sugar until smooth.
- Add eggs and vanilla extract; mix until combined.
- Gradually add dry ingredients to wet mixture; fold in chocolate chips.
- Divide dough into three sections; color two with gel food coloring (red and blue).
- Roll each section into logs and combine them into one uniform log.
- Cut into desired cookie sizes, place on sheets, and bake for about 10 minutes until edges are lightly browned.
- Let cool before decorating with edible glitter stars.
Nutrition
- Serving Size: 1 cookie (40g)
- Calories: 170
- Sugar: 12g
- Sodium: 95mg
- Fat: 8g
- Saturated Fat: 5g
- Unsaturated Fat: 3g
- Trans Fat: 0g
- Carbohydrates: 23g
- Fiber: 1g
- Protein: 2g
- Cholesterol: 35mg


Leave a Comment