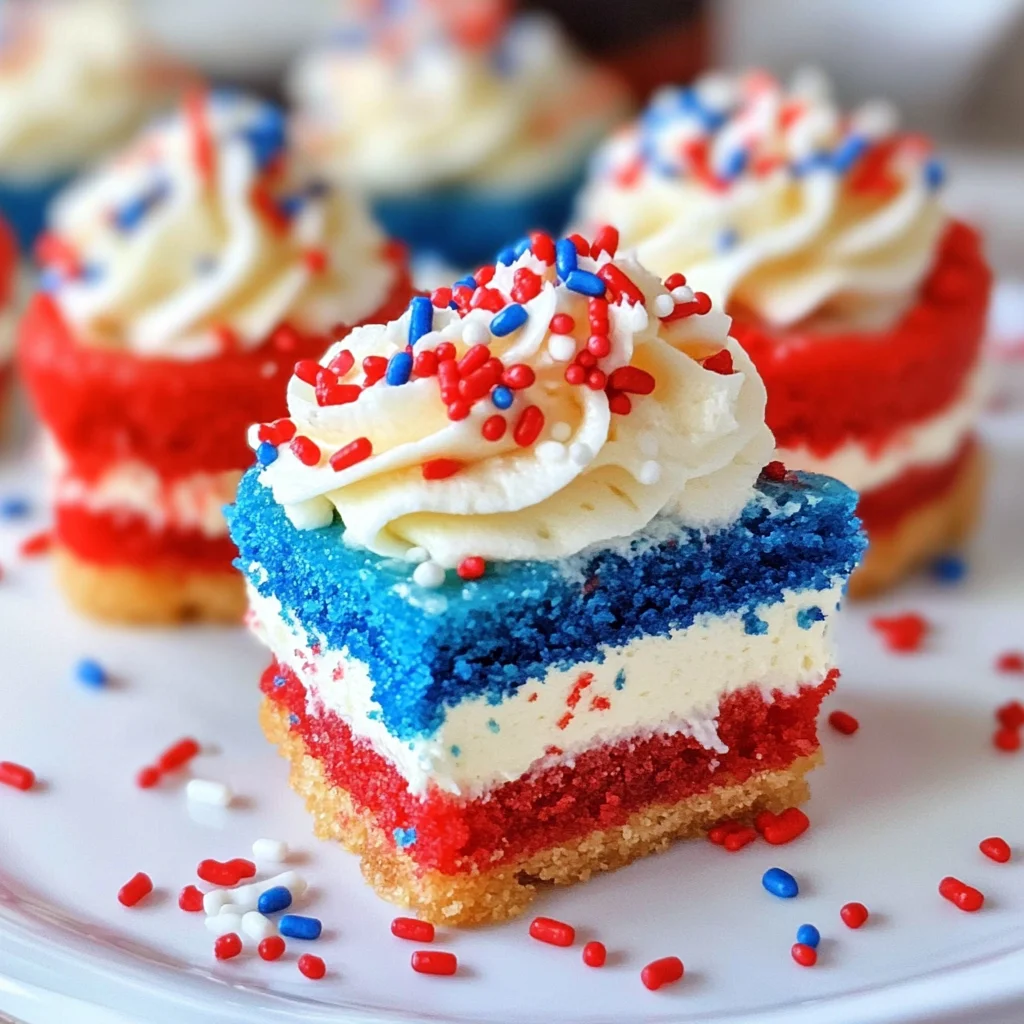
These Red, White and Blue Mini Cheesecakes are a delightful treat that perfectly embodies festive spirit! With their creamy texture and vibrant colors, these mini cheesecakes are ideal for celebrations like Independence Day or any gathering where you want to impress guests. They are not only visually appealing but also incredibly easy to make, combining the rich flavors of cream cheese with a sweet, crunchy crust. Enjoy these delicious desserts at parties, picnics, or as a fun family treat!
Why You’ll Love This Recipe
- Easy to Make: With simple steps and common ingredients, you’ll have these cheesecakes ready in no time.
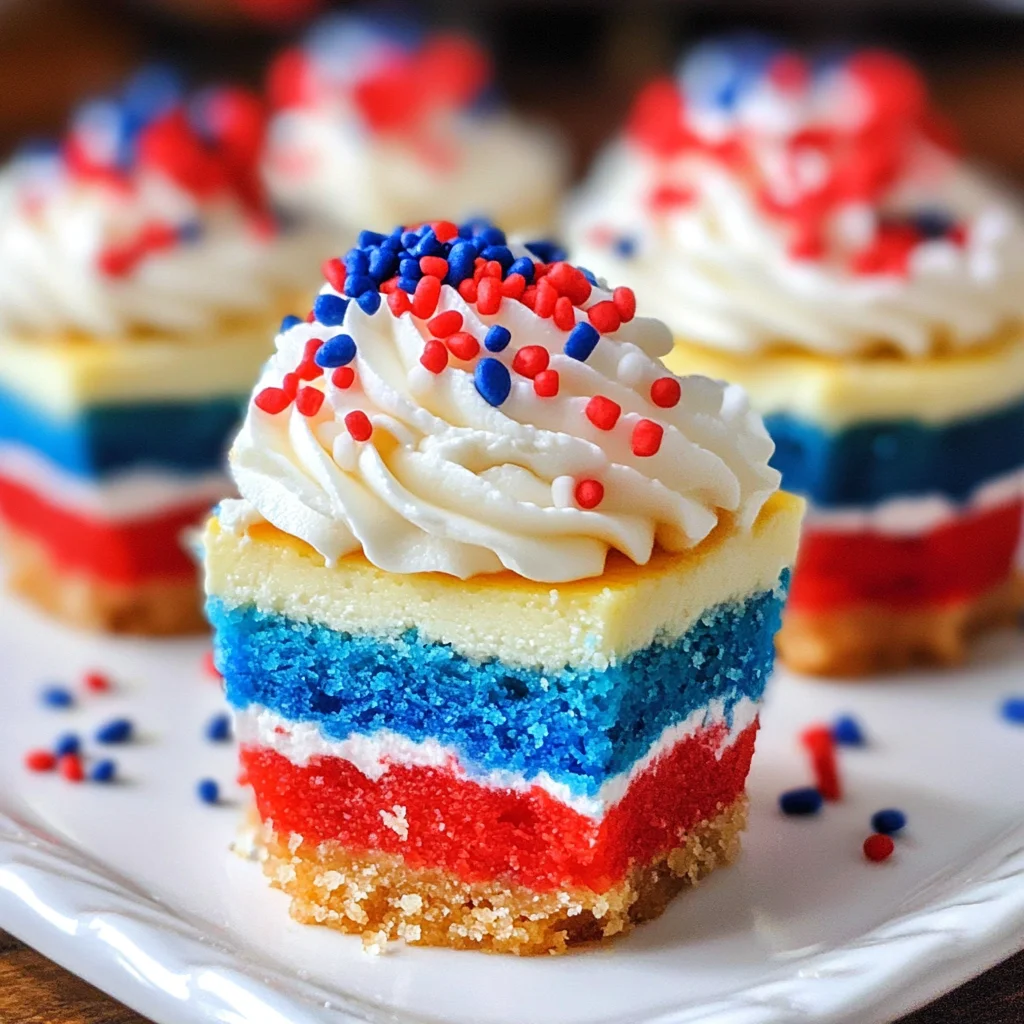
- Visually Stunning: The layered red, white, and blue colors make for an eye-catching dessert that stands out on any table.
- Versatile for Celebrations: Perfect for holidays like the 4th of July, birthdays, or any festive occasion.
- Rich Flavor: The combination of cream cheese and whipped topping creates a rich and creamy flavor profile everyone will love.
- Customizable Toppings: Feel free to add your favorite toppings or sprinkles to make them even more special!
Tools and Preparation
Before you get started on your Red, White and Blue Mini Cheesecakes, gather your tools to ensure a smooth baking experience.
Essential Tools and Equipment
- Cupcake pan
- Cupcake liners
- Mixing bowls
- Electric mixer
- Measuring cups and spoons
- Rubber spatula
- Whisk
Importance of Each Tool
- Cupcake Pan: This is essential for holding the mini cheesecakes in place while they bake.
- Electric Mixer: Using an electric mixer helps achieve a smooth filling without lumps.
- Rubber Spatula: A rubber spatula is perfect for scraping down the sides of bowls to ensure all ingredients are well mixed.
Ingredients
To create these delightful Red, White and Blue Mini Cheesecakes, gather the following ingredients:
For the Crust
- 1 cup (134g) vanilla wafer cookie crumbs
- 2 tbsp (26g) sugar
- 4 tbsp (56g) butter, melted
For the Filling
- 12 ounces (339g) cream cheese, room temperature
- 1/2 cup (104g) sugar
- 3 tbsp (24g) flour
- 1/2 cup (115g) sour cream
- 1 1/2 tsp vanilla extract
- 2 eggs
- Blue gel icing color
- Red gel icing color
For the Whipped Cream Topping
- 1/2 cup (120ml) heavy whipping cream, cold
- 5 tbsp (36g) powdered sugar
- 1/2 tsp vanilla extract
- Sprinkles
How to Make Red, White and Blue Mini Cheesecakes
Step 1: Preheat the Oven
Preheat your oven to 325°F (162°C). Line a cupcake pan with cupcake liners.
Step 2: Prepare the Crust
- In a medium bowl, combine the vanilla wafer cookie crumbs, sugar, and melted butter.
- Divide this mixture evenly among the cupcake liners—about 2 tablespoons per cup—and press it firmly into the bottoms.
Step 3: Bake the Crusts
Bake the crusts in the preheated oven for about 5 minutes. Remove from oven and allow them to cool while you prepare the filling.
Step 4: Make the Filling
- Lower the oven temperature to 300°F (148°C).
- In a large mixing bowl, beat together the cream cheese, sugar, and flour. Use low speed to avoid adding too much air into the batter which can cause cracks.
- Scrape down the sides of the bowl as needed.
- Add in the sour cream and vanilla extract. Beat on low speed until combined.
- Add the eggs one at a time, beating slowly and scraping down after each addition.
Step 5: Color the Batter
Divide your batter evenly into three separate bowls:
– Leave one bowl plain.
– Color one bowl with red gel icing color.
– Color another bowl with blue gel icing color.
Step 6: Layering Batter Into Cups
Layer each colored batter into your cooled crusts:
1. Start with one tablespoon of white batter in each cup.
2. Follow with one tablespoon of red batter.
3. Lastly, add one tablespoon of blue batter until cups are mostly full.
Step 7: Bake Cheesecakes
Bake for 18-20 minutes. After baking, turn off the oven but keep it closed for another 10 minutes.
Step 8: Cool Down
Crack open the oven door slightly and let cheesecakes cool for about 15-20 minutes before transferring them to the fridge until completely cooled.
Step 9: Prepare Whipped Cream Topping
In a large mixing bowl:
1. Combine cold heavy whipping cream, powdered sugar, and vanilla extract.
2. Whip on high speed until stiff peaks form.
Step 10: Finish Your Cheesecakes
Once cooled:
1. Remove cheesecakes from their pan.
2. Pipe whipped cream onto each cheesecake top and add sprinkles as desired.
Step 11: Store
Refrigerate your mini cheesecakes in an airtight container until ready to serve. They taste best within 2-3 days!
How to Serve Red, White and Blue Mini Cheesecakes
These Red, White and Blue Mini Cheesecakes are a delightful treat for any gathering. Here are some fun and creative serving suggestions to enhance your presentation.
Individual Dessert Plates
- Serve each cheesecake on its own plate with a garnish of fresh berries for an elegant touch.
Festive Platters
- Arrange the mini cheesecakes on a colorful platter with red, white, and blue decorations to emphasize the patriotic theme.
Party Favors
- Package individual mini cheesecakes in clear containers tied with red, white, and blue ribbons for guests to take home.
Ice Cream Pairing
- Offer a scoop of vanilla or berry-flavored ice cream alongside each cheesecake for an extra creamy delight.
Fruit Salad Side
- Serve with a refreshing fruit salad that includes strawberries, blueberries, and bananas to complement the cheesecake flavors.
How to Perfect Red, White and Blue Mini Cheesecakes
To ensure your mini cheesecakes turn out perfectly every time, follow these helpful tips.
- Use room temperature ingredients: Allow cream cheese, eggs, and sour cream to come to room temperature for a smoother batter.
- Mix gently: Combine ingredients at low speed to prevent excess air from causing cracks in your cheesecakes during baking.
- Don’t overbake: Keep an eye on the baking time; overbaking can lead to dry cheesecakes. They should be slightly jiggly in the center.
- Cool gradually: Let the cheesecakes cool in the oven with the door ajar to avoid sudden temperature changes that can crack them.
- Chill thoroughly: Refrigerate your mini cheesecakes for several hours or overnight before serving for the best texture and flavor.
- Decorate just before serving: Add whipped cream and sprinkles right before serving to keep them fresh and visually appealing.
Best Side Dishes for Red, White and Blue Mini Cheesecakes
Pairing side dishes with your Red, White and Blue Mini Cheesecakes can elevate your dessert experience. Here are some great options:
- Fresh Berry Salad: A mix of strawberries, blueberries, and raspberries tossed lightly with mint leaves provides a refreshing contrast.
- Vanilla Ice Cream: Classic vanilla ice cream complements the richness of cheesecakes while balancing sweetness.
- Fruit Skewers: Assemble skewers with alternating red and blue fruits like strawberries and blueberries for easy eating.
- Chocolate Dipped Strawberries: These treats add an indulgent twist that pairs well with the creamy texture of mini cheesecakes.
- Cheese Platter: A selection of mild cheeses provides a savory balance to sweet desserts—consider adding crackers as well.
- Lemon Sorbet: A zesty lemon sorbet offers a light palate cleanser between bites of rich cheesecake.
- Nut Mix: A crunchy nut mix adds texture contrast while providing a salty element that balances sweetness.
Common Mistakes to Avoid
Making Red, White and Blue Mini Cheesecakes can be a delightful experience, but here are some common mistakes to watch out for.
- Not using room temperature cream cheese – Cold cream cheese can lead to lumps in the batter. Always allow it to sit out at room temperature for at least 30 minutes before mixing.
- Skipping the cooling step – Immediately removing cheesecakes from the oven can cause them to crack. Allow them to cool gradually with the oven door cracked open.
- Overmixing the batter – Excessive mixing adds air, which can create cracks during baking. Mix just until ingredients are combined for a smooth texture.
- Incorrect baking temperature – Baking at too high a temperature can lead to uneven cooking and cracks. Follow the recipe’s specified temperatures closely.
- Not layering colors properly – To achieve that festive look, layer the colored batters carefully. Use a spoon for better control when adding each color.
Storage & Reheating Instructions
Refrigerator Storage
- Store in an airtight container for up to 3 days.
- Ensure they are fully cooled before sealing to maintain texture.
Freezing Red, White and Blue Mini Cheesecakes
- Wrap each mini cheesecake tightly in plastic wrap and place in a freezer-safe container.
- They can be frozen for up to 2 months.
Reheating Red, White and Blue Mini Cheesecakes
- Oven – Preheat to 350°F (175°C) and warm for about 10-15 minutes.
- Microwave – Heat on low power in 10-second intervals until warm.
- Stovetop – Place in a covered pan over low heat, checking frequently until warmed through.
Frequently Asked Questions
Here are some common questions regarding Red, White and Blue Mini Cheesecakes that you might find helpful.
Can I make Red, White and Blue Mini Cheesecakes ahead of time?
Yes! These mini cheesecakes can be made a day in advance and stored in the fridge until ready to serve.
How do I customize the flavors of these mini cheesecakes?
Feel free to add different extracts or fruit purees into the batter for unique flavors like lemon or berry!
What is the best way to decorate Red, White and Blue Mini Cheesecakes?
Top with whipped cream, fresh berries, or themed sprinkles for extra flair!
Can I use alternative sweeteners in this recipe?
Absolutely! You can substitute sugar with your preferred sweetener; just ensure it’s suitable for baking.
How long do Red, White and Blue Mini Cheesecakes last?
They will stay fresh in the refrigerator for about 3 days. For longer storage, consider freezing them.
Final Thoughts
These Red, White and Blue Mini Cheesecakes are not only visually appealing but also deliciously creamy. They are perfect for any celebration! Feel free to customize with different colors or toppings based on your event theme. Try them out today!
Red, White and Blue Mini Cheesecakes
Indulge in the festive delight of Red, White and Blue Mini Cheesecakes, a perfect treat for gatherings and celebrations. These colorful mini desserts combine a rich cream cheese filling with a crunchy cookie crust, all presented in eye-catching layers that evoke the spirit of summer festivities. Easy to prepare and customizable with your favorite toppings, these cheesecakes are sure to impress both family and friends. Whether it’s for Independence Day, birthday parties, or any special occasion, these delightful bites bring joy to the table. Fun to make and even more fun to eat, they’re an excellent way to celebrate any event while satisfying your sweet tooth.
- Prep Time: 20 minutes
- Cook Time: 25 minutes
- Total Time: 45 minutes
- Yield: Makes approximately 12 mini cheesecakes 1x
- Category: Dessert
- Method: Baking
- Cuisine: American
Ingredients
- 1 cup vanilla wafer cookie crumbs
- 2 tbsp sugar
- 4 tbsp butter, melted
- 12 ounces cream cheese, room temperature
- 1/2 cup sugar
- 3 tbsp flour
- 1/2 cup sour cream
- 1 1/2 tsp vanilla extract
- 2 eggs
- Blue gel icing color
- Red gel icing color
- 1/2 cup heavy whipping cream, cold
- 5 tbsp powdered sugar
- 1/2 tsp vanilla extract
- Sprinkles
Instructions
- Preheat oven to 325°F (162°C) and line cupcake pan with liners.
- In a medium bowl, combine vanilla wafer cookie crumbs, sugar, and melted butter; press into liners.
- Bake crusts for 5 minutes; cool.
- In a large mixing bowl, beat cream cheese, sugar, and flour until smooth; add sour cream and vanilla.
- Incorporate eggs one at a time; divide batter into three bowls—leave one plain and color one red and another blue.
- Layer batters in crusts: white first, then red, then blue.
- Bake for 18-20 minutes; cool in the oven with the door ajar.
- Whip heavy cream with powdered sugar until stiff peaks form; pipe onto cooled cheesecakes.
Nutrition
- Serving Size: 1 serving
- Calories: 190
- Sugar: 12g
- Sodium: 120mg
- Fat: 12g
- Saturated Fat: 7g
- Unsaturated Fat: 4g
- Trans Fat: 0g
- Carbohydrates: 17g
- Fiber: 0g
- Protein: 3g
- Cholesterol: 40mg
Leave a Comment